Connecting a Rohde Schwarz AMIQ to a SMIQ04

Connecting a Rohde Schwarz AMIQ to a SMIQ04

The first 
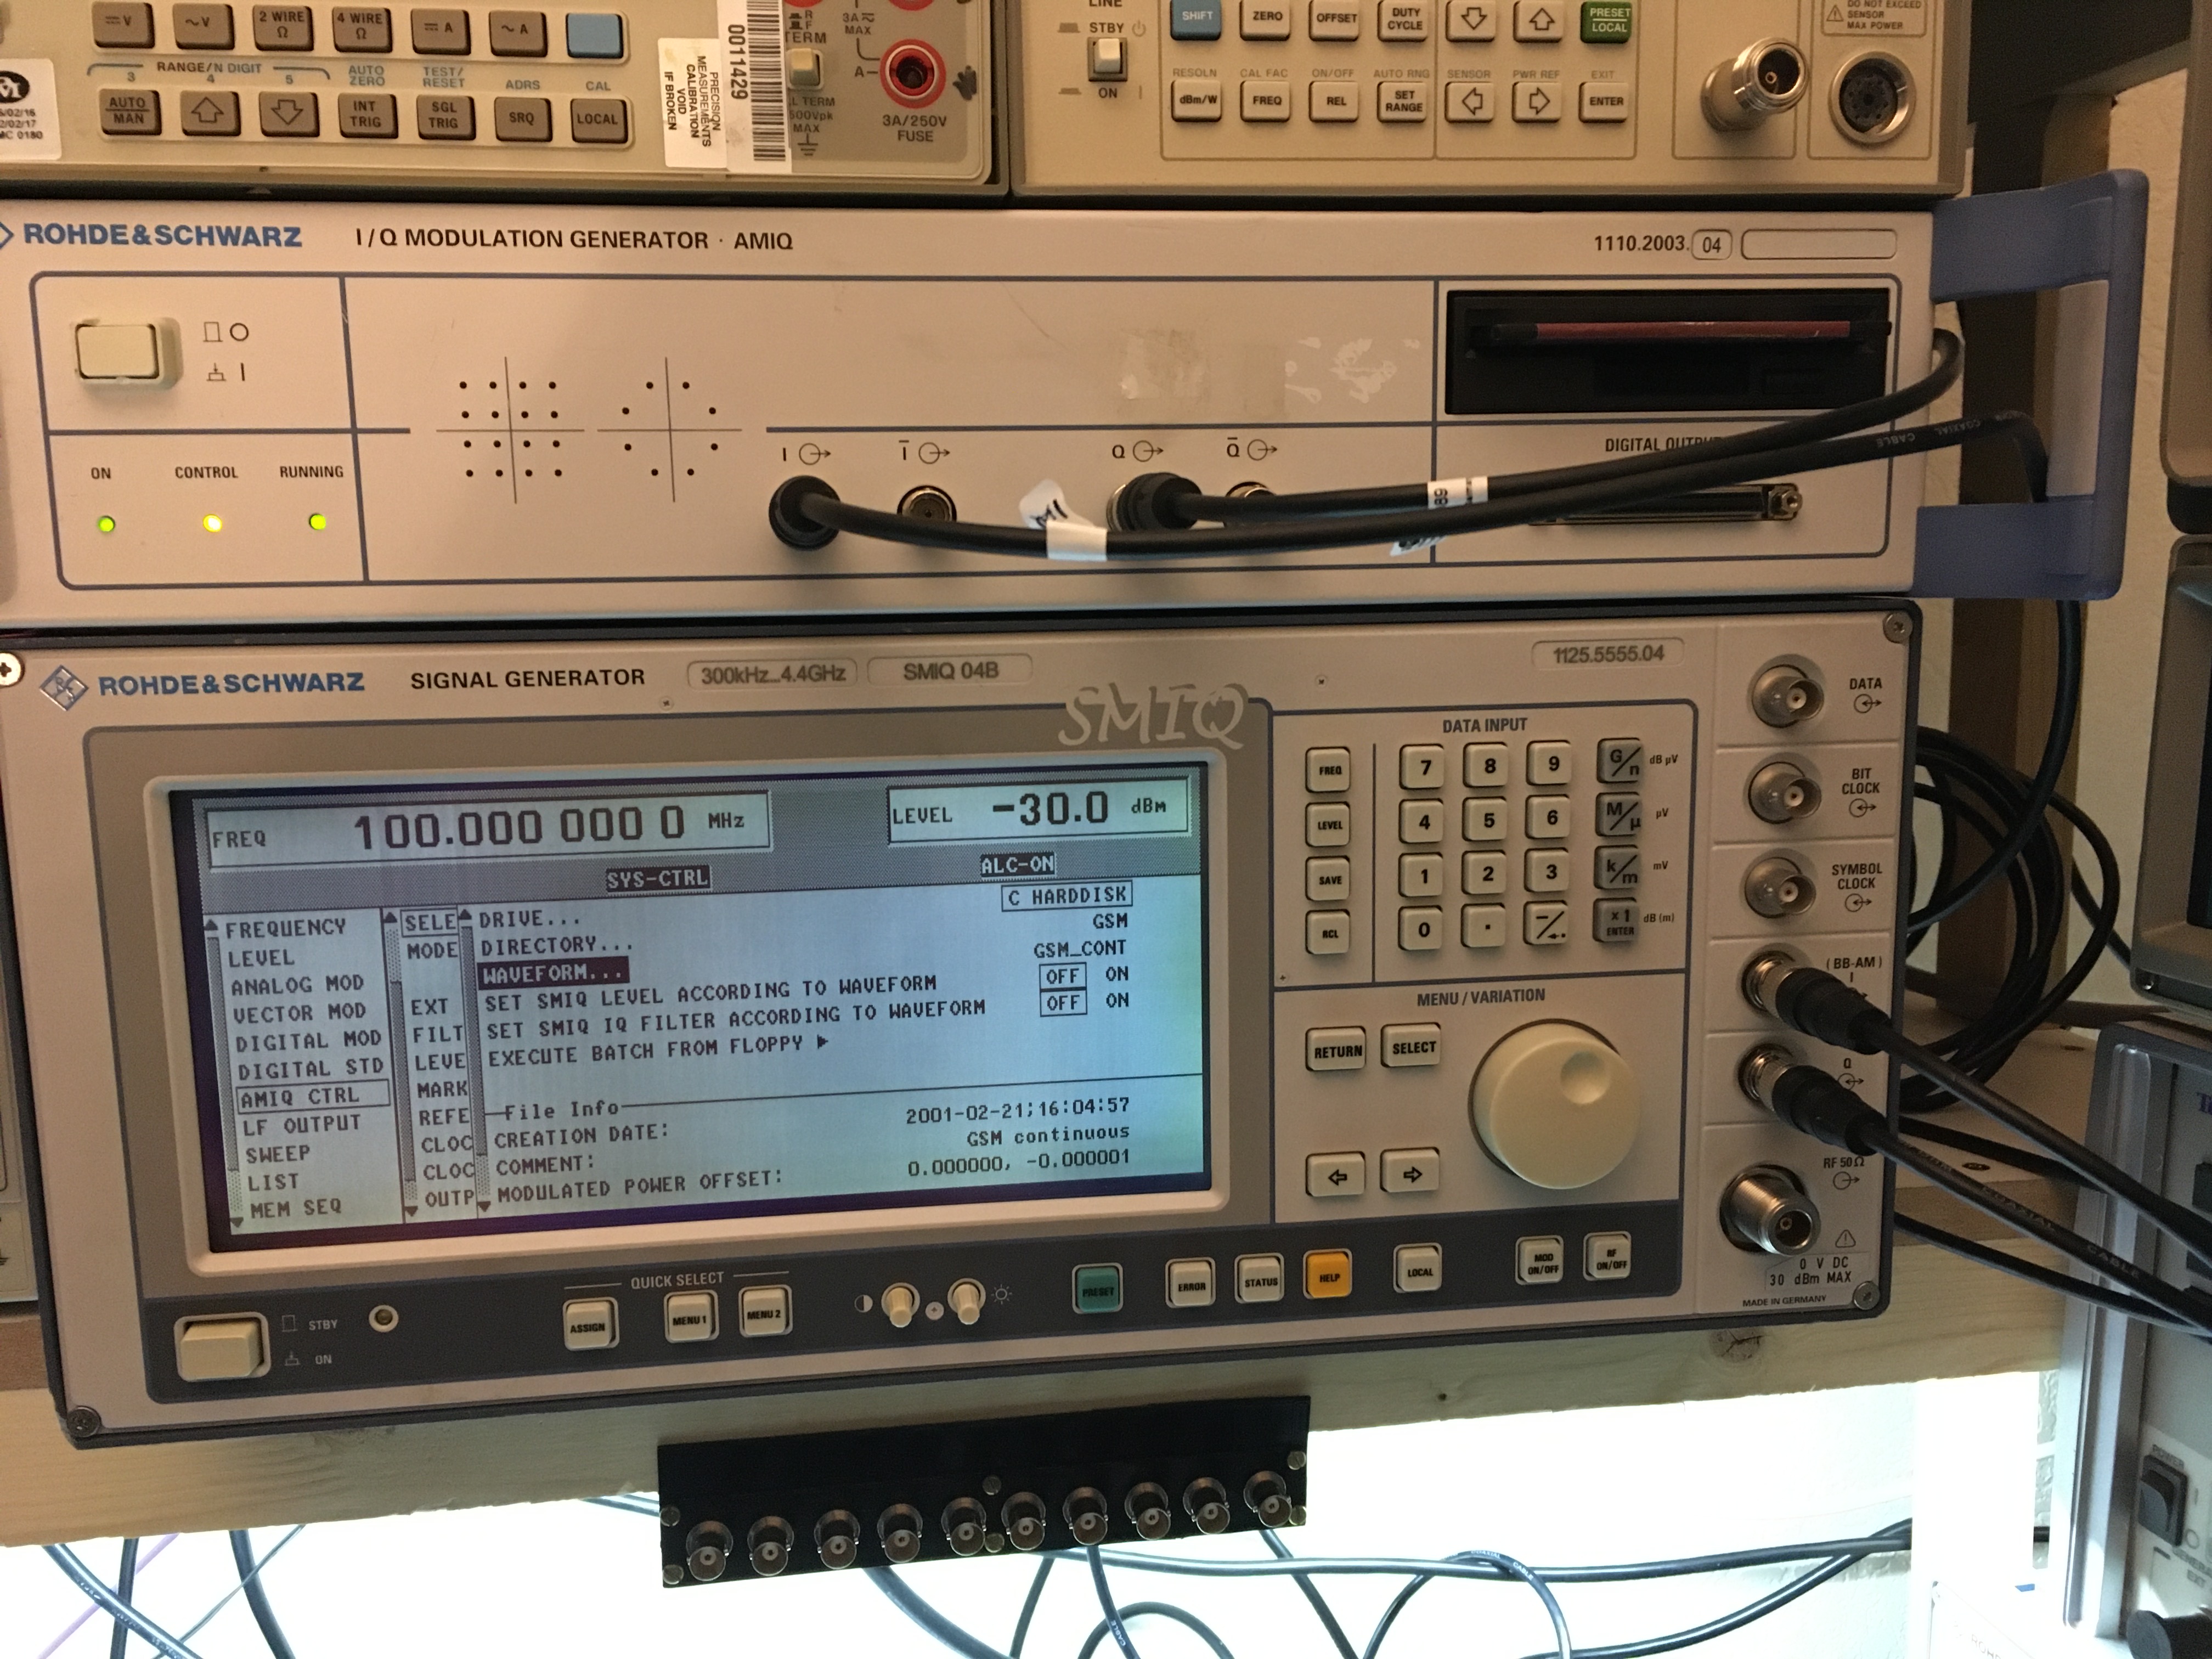
article explains how to setup an R&S AMIQ and talk to it, and to get signals out of the I and Q outputs. In this article the AMIQ is connected to a SMIQ04. In this setup the AMIQ provides the IQ modulation, and the SMIQ is providing modulated signal on its RF output.

Prerequisites

To be able to use the SMIQ and AMIQ together, a vector modulator (IQMOD variant 4 or higher (var. 8) must be installed in the SMIQ.

Connecting the R&S AMIQ to R&S SMIQ

There are a couple of options on how to connect and control the R&S AMIQ. It’s possible to control the AMIQ from the SMIQ. Or control the AMIQ by a PC.In this setup I’m connecting the R&S SMIQ and R&S AMIQ together by the use of an IEEE-488 cable, so GPIB can be used to control the instruments.

One think to keep in mind is that when using the SMIQ to control the AMIQ, the SMIQ is acting as a controller. And there can only be one controller active on the bus at the same time.

The output “I” and”Q” of the R&S AMIQ must be connected to the “I” and “Q” inputs on tthe R&S SMIQ.

Generating signals

When using the SMIQ as a controller, the signals of the AMIQ can be used as follows:

In the menu Utilities/Install the option AMIQ control must be enabled. After enabling the SMIQ must be rebooted.

After reboot an extra menu option: IMQ CTRL is visible. In this menu the following options must be selected and set:

    • Start by setting carrier frequncy
    • Set the level of the output signal (for example 0 dBm)
    • Select the option: SELECT WAVEFORM
    • Next select: Drive and choose C:
    • Pick a waveform, or change to directory to select a waveform
    • Press return and select menu Mode.
    • In the Mode menu select AUTO
    • Press Return key, and select menu option Level
    • In the Level menu set the I and Q outputs to 0.5V/50 Ohm
    • Press return key, and go to Vector mod, and set state to “On”

The modulated signal should now be present on the RF output.

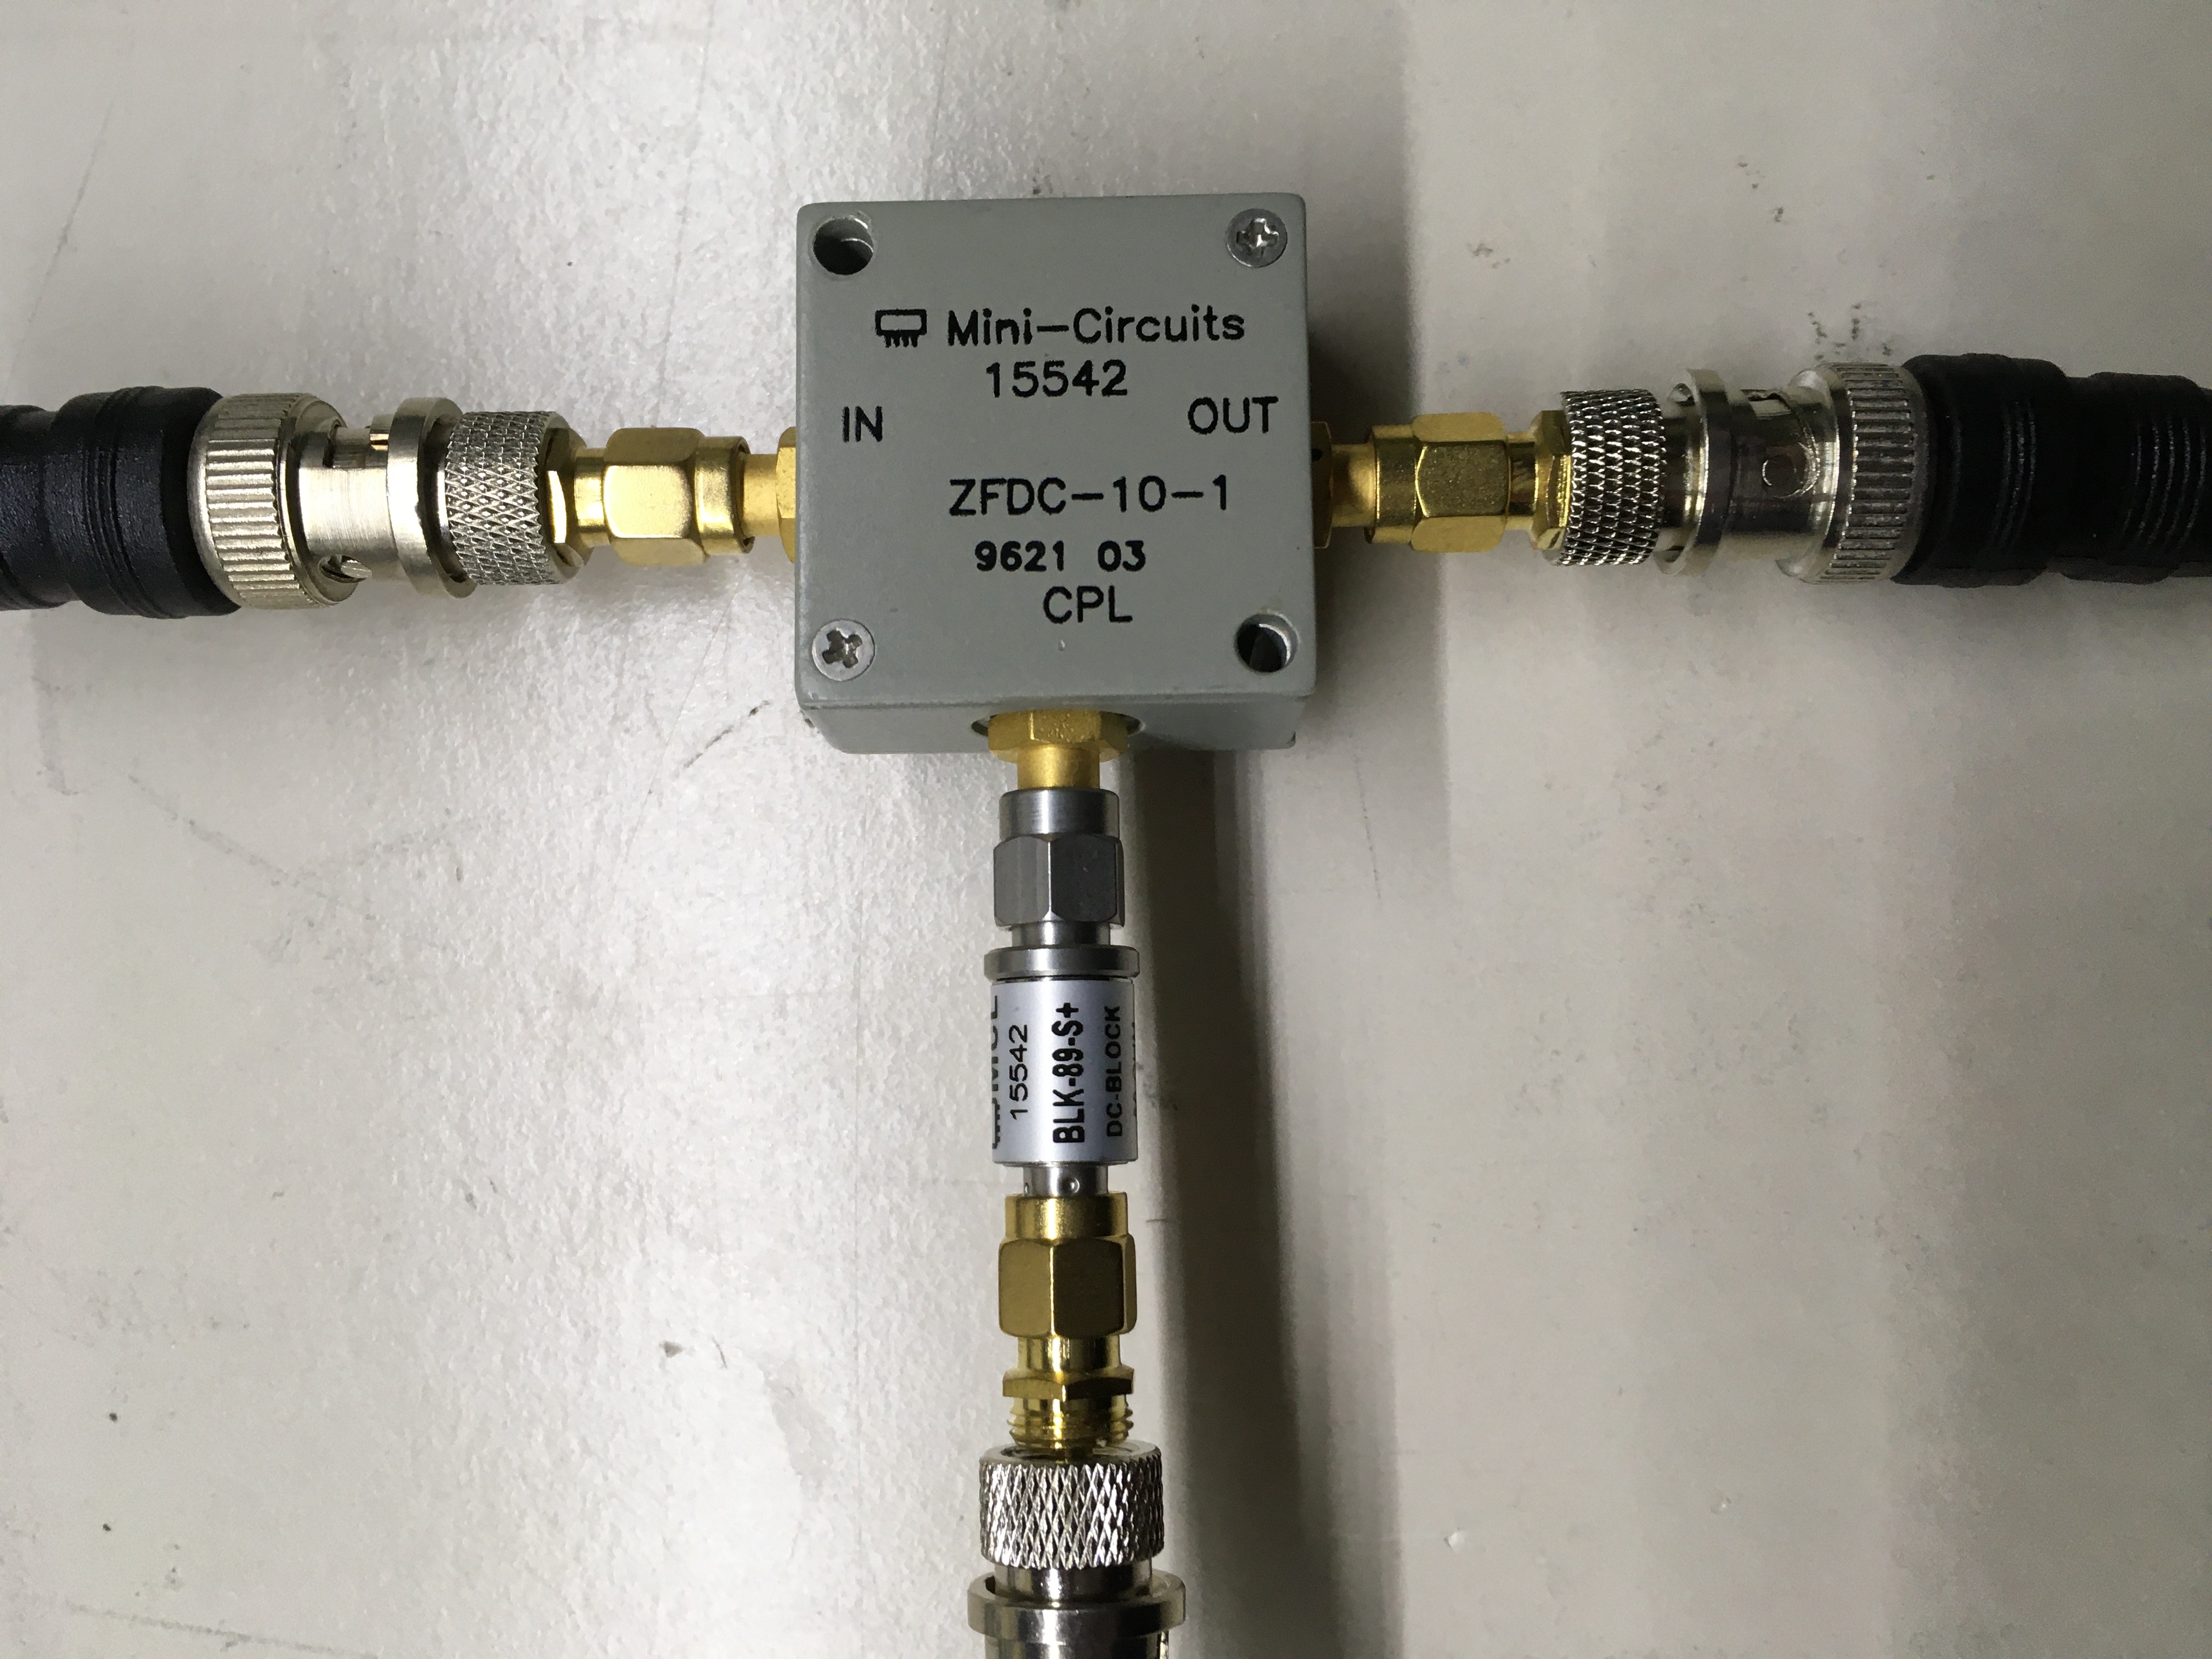
To demonstrate a modulated signal which is generated by the AMIQ I use a directional coupler.


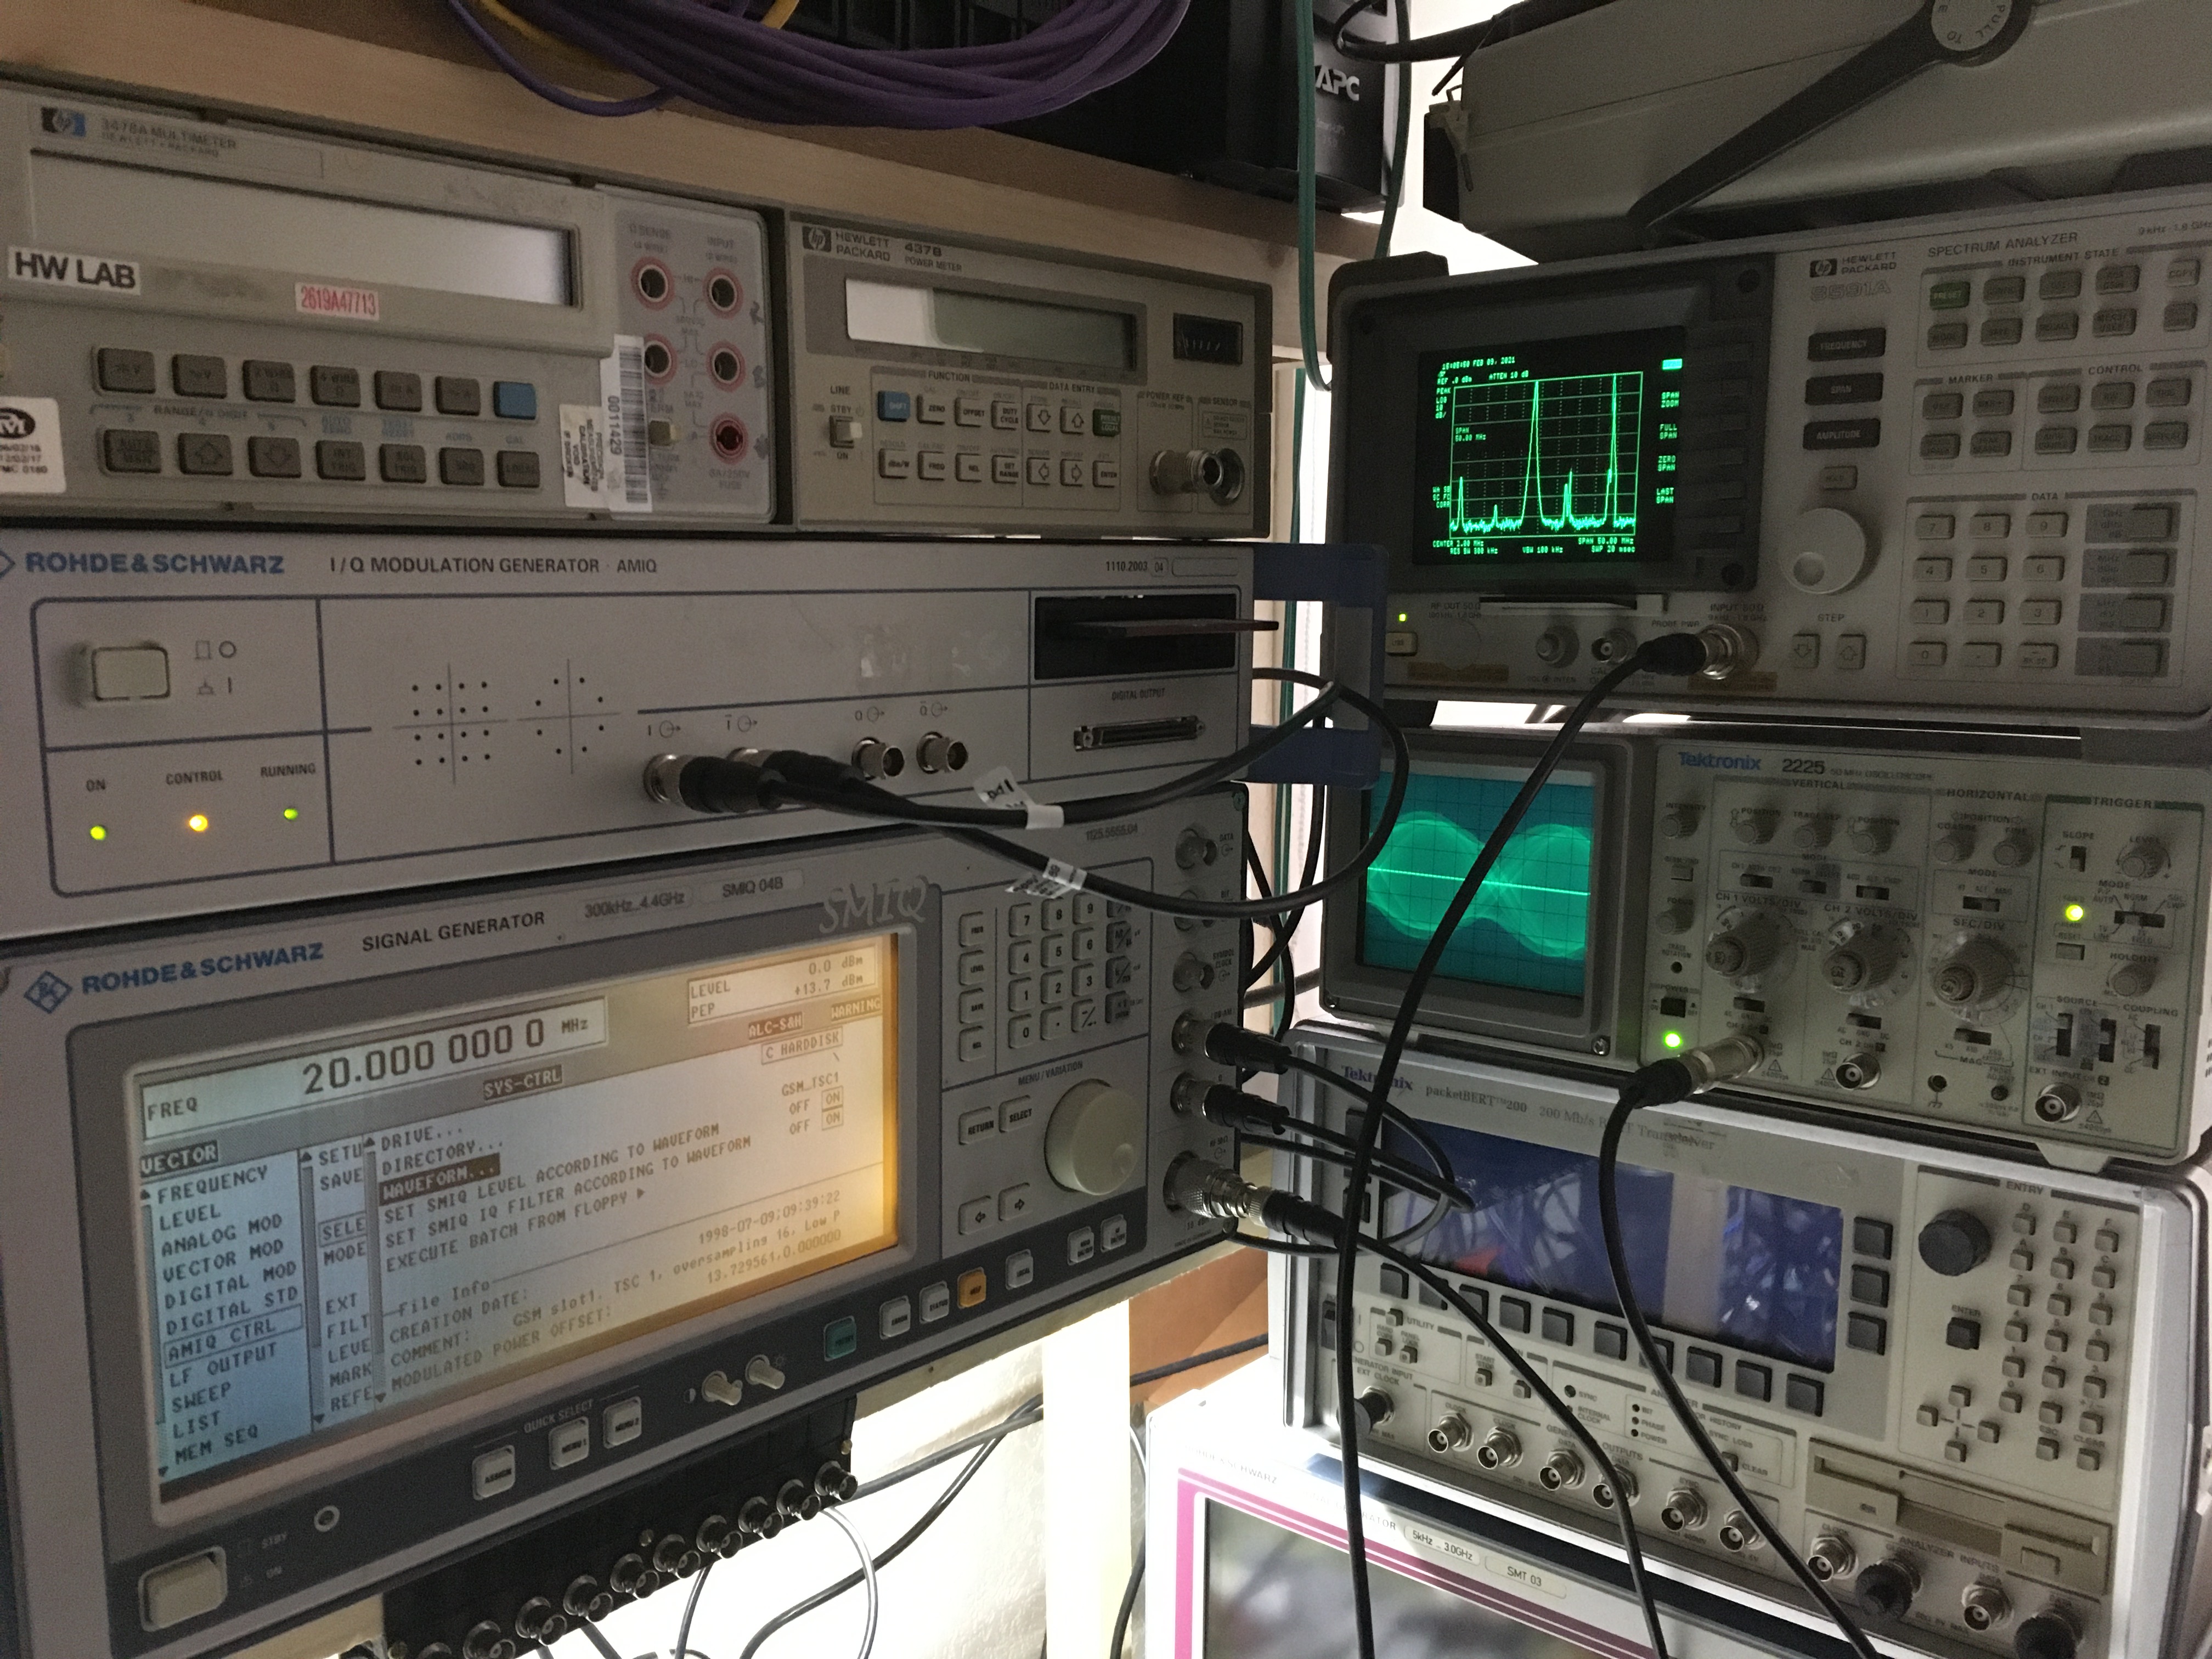
I connected the directional couple’s input port the the RF output port of the SMIQ. The output port of the directional coupler is connected to a Tektronix 2225 scope. The CPL port is connected to a HP8591A.

Note that I connected the NOT I port, so I could create a interesting signal, which is a challenge to trigger on the Tek 2225.


Getting an Rohde Schwarz AMIQ up and running

Introduction

The Rohden Schwarz AMIQ is an IQ modulation generator. According to the documentation of Rohden Schwarz this device has:


    • 100 MHz sample rate
    • 16 M Samples memory depth
    • IF generation up to 25 MHz
    • Multiple carrier simulation

And the best part is.. these devices can be picked up for little money.  Even if one is not into IQ modulation and such, the device is able to put out some very nice looking sine waves. There is a catch however. (There is always a catch): The AMIQ can only be controlled remotely.

What to look for when buying an AMIQ

When buying an AMIQ, look at the options the unit has. The user manual which can be found online, list all the available hard-, and software options.

Secondly, the AMIQ has a built in hard disk. If this drive is damaged, you could be out of luck. I searched online, but could not find any firmware images. If you bought an AMIQ, then make a image of the internal hard disk.  The AMIQ boots OpenDos.

There is an easy way to determine if the AMIQ is in a working condition. And that is to listen to the beeps at startup. The device will give one beep when turned on, and a few moments later, a second beep is produced. It’s the AMIQ’s way of letting you know it’s past it’s error checking thing. This second beep,should be followed by a steady green LED on the front panel.

If none of the above is happening, the AMIQ is having a fault, or the AMIQ didn’t start in a sane state. There seems to be a service manual for the AMIQ, where you can troubleshoot. Unfortunately I could not find the service manual online.

So when buying an AMIQ, let the seller boot up the AMIQ, and let the seller describe to you the boot process.

Once you got physical access to the AMIQ, you could run the the command:

*TST?

This should return a 0 when no errors are found, or a 1 if a error is found. The user manual describes in detail how to hardware test the AMIQ. Also note that the above command doesn’t test the RAM memory.

The third thing you may be aware of, are the different models:

    • AMIQ02
    • AMIQ03
    • AMIQ04

I never encounter the AMIQ01, however the AMIQ03 and 04 are the newer models, with more memory, sample rates etc. The main difference between the AMIQ03 and 04 is greater memory: The 04 has up to 16 000 000 IQ values, compared to the 03: 4 000 000 I/Q values)

Only the models 03 and 04 can have the option “AMIQ-B3” fitted. So if you see an AMIQ listed with the option “AMIQ-B3” you know it has to be a 03 or 04 model.

Controlling the AMIQ

To let the AMIQ do something useful, like spitting out signals, the AMIQ needs remote control. And for this remote controlling there are several options:

    • Through serial connection
    • Through IEEE-488 (GP-IB or also called HP-IB)
    • Use an Rohde Schwarz SMIQ
    • Use software like WinIQSim (version 1.x)

Luckily I got all the options…

Talking to the AMIQ

The easiest way of getting the AMIQ up and running is to connect a null modem cable to the RS232 port. If someone has changed the default serial parameters (9600,8n1) an formatted floppy disk (MSDOS) is needed with the file: AUTOEXEC.IEC with the following line:

:SYST:COMM:SER:BAUD 9600

Insert the floppy disk into the AMIQ, turn the AMIQ off, and on again. Once the AMIQ is fully booted, the serial console should be accessible.

When you have the luxury of having IEEE-488 or you could reset the the default address 6 with similar procedure, the line in the AUTOEXEC.IEC must be:

:SYST:COMM:GPIB:ADDR 6

Once a working connection is established to the AMIQ, the following command should give you the directories on the hard drive C:

:MMEM:DIR?

To load an waveform, and put out the signals on the I and Q outputs, give the following commands:

*RST;*CLS;*WAI
:MMEM:CD 'C:\'
:MMEM:LOAD RAM, 'GSM_TSC1.WV,TRAC'
:TRIG:MODE CONT
:OUTPUT:I FIX
:OUTPUT:Q FIX

The commands on the first line resets the device. Next the directory is changed to the C: drive. On the third line a waveform called: “GSM_TSC1.WV” is loaded into RAM memory. By setting the trigger to continuous on the next line, the waveform is send to the outputs, which are enabled on the last two lines.

This produces the following signal:

In the next article I’m going to hook up the AMIQ to the Rohde and Schwarz SMIQ04 and generate some signals.

Repairing Rohde & Schwarz SMT03 RF Signal Generator – part one

The R&S SMT03

The R&S SMT03 is a RF signal generator which can generate signals from 5Khz up to 3Ghz, while the signal level can be from -144dBm to +13dBm with 0.1dBm resolution.

A datasheet of the R&S SMT03 can be found [here]

Signal generators like the SMT03, and other (for example the HP ESG series like the E4421B) are mainly used to test communication devices and a like. Signal generators like this, are not arbitrary signal generators (however they may have an option to generate LF (Low Frequency) signals like square, sine, sawtooth wave-forms.

RF Signal generators generate sinus signal, and can generate different modulations (FM,PM,AM etc). These signal generators are a specialized piece of equipment.

An R&S SMT03 with problems

The SMT03 I’ve got in the LAB has some problems:

    • A few lines are visible on the LCD screen
    • When the unit is on for some tine, above 1.8Ghz the error: 110 Output Unleveled ALC failure is displayed .

The lines on the LCD screen are somewhat annoying, they don’t influence the working of the unit. The ALC Unleveled error does. When I try to measure the signal, the level is all over the place, and has a low level.  I noticed that in the short time this error is not present I can loose up to 4dBm when I generate signal above 1.8Ghz.

The challenges

When trying to fix an error like this, it’s important to understand the error. At the time this error presented itself, I didn’t had access to a Service Manual. And from the User manual I didn’t got any wiser. So after some thinking I concluded that ALC must stand for: Attenuation Level Control

This leads me to the conclusion that a possible cause could be a PLL circuit which is unable to establish a successful lock.  The bad news is: this may be due to a lot of other problems:

    • The input frequency may be of, or the signal is to low
    • Power problem (low / not working power rail
    • Mixer problem
    • And a lot of other related problems

Trying to diagnose the problem futher

So to diagnose such a problem, a block diagram and a schematic would be very helpful. But I got neither of them.

Another challenge is that the unit consists of modules, which plug into a back-plane. Operating the modules outside of the  unit seems only possible with a “service kit” which I don’t have access to, and cannot find any information about.

Despite the fact I don’t have the above items, I can observe the error, and take a look at how the physical signal path. So I opened the unit by removing the covers. Which is a simple and straightforward process: By unscrewing the bumpers on the back of the unit the top and bottom covers come off.

R&S SMT03 on the inside

Tracing from the output connector the signal path back I noticed that:

  • From the output connector, the signal is going through an attenuator, and then straight into a 3Ghz module (W154).
  • From the 3Ghz module the signal is entering an 1.5Ghz module (W104).
  • From this module the signal is going to a synth module, and a signal generator module.

And this tells me that the 3Ghz module has some kind of “pass-through”, so that signals up to 1.5Ghz are passed through the 3Ghz module (not sure at this point if some additional filtering is done). When signals are above 1.5Ghz the 3Ghz module generates the frequencies from 1.5 till 3Ghz.

This could mean that the ALC Unleveld error is somewhere in the 3Ghz module. Which means I could leave all the other modules alone.

For a moment I was thinking about a possible power rail problem, however this is most unlikely, since I aspect that for every frequency the ALC Unleveled error should be displayed, or that other errors would pop-up.

To summarize

    • Working on these units is not easy
    • A Service manual would be a great help

In [part 2] I’m going to try to repair this R&S SMT-03